 Skip to content
Grow Culantro Indoors and Outdoors: A Complete Guide
Culantro (Eryngium foetidum) is a fascinating herb that often surprises gardeners with its powerful, cilantro-like flavor and remarkably resilient growth
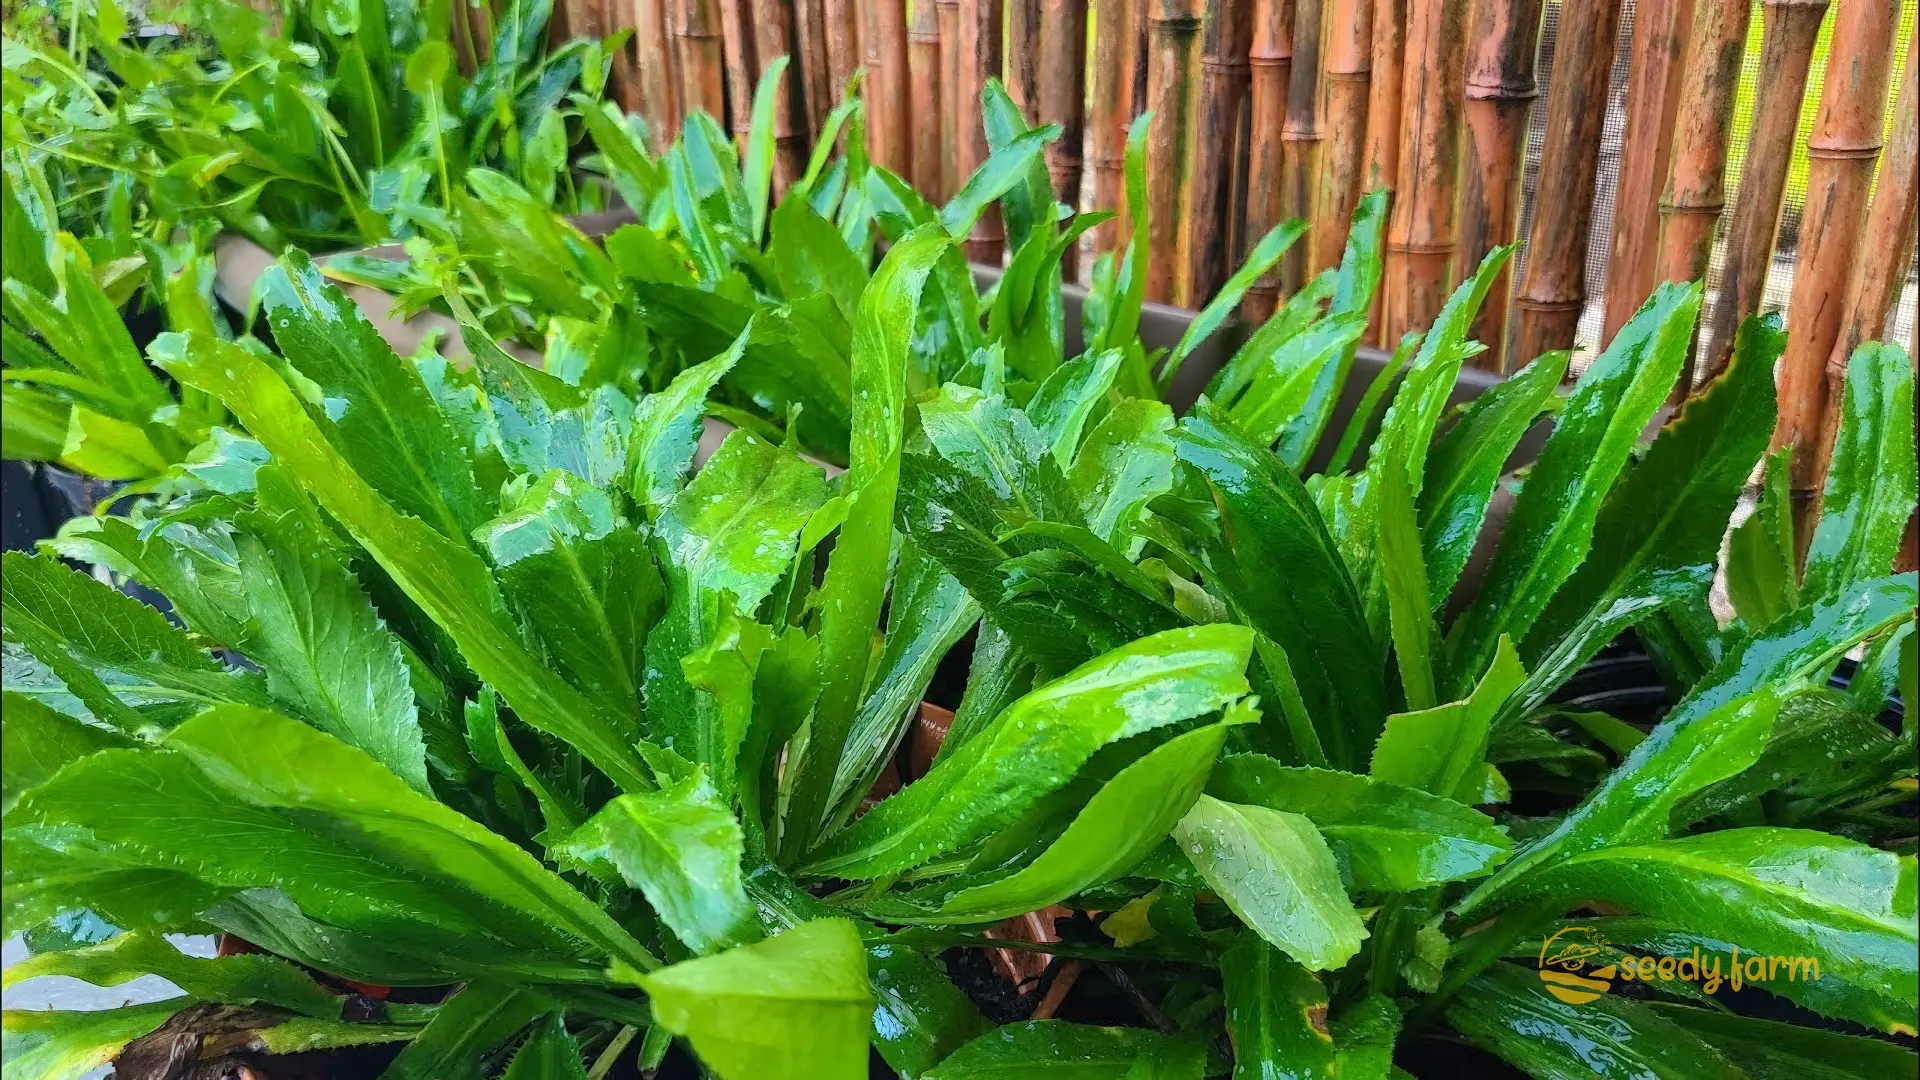
Culantro (Eryngium foetidum) is a fascinating herb that often surprises gardeners with its powerful, cilantro-like flavor and remarkably resilient growth habit. Unlike its delicate cousin cilantro (Coriandrum sativum), culantro boasts a more intense taste that holds up well to cooking and remains productive throughout hot summers without needing frequent replanting, a common issue known as bolting in cilantro. This tropical herb, technically a biennial or short-lived perennial often grown as an annual in cooler climates, is a cornerstone ingredient in Caribbean, Latin American, and Southeast Asian cuisines, making it a rewarding addition to any herb garden or container collection.
My own journey with culantro began years ago out of curiosity sparked by a seed catalog description. Growing this unique herb has been a delightful adventure, revealing its adaptability and bold personality in the garden and kitchen. Known by many names including Mexican Coriander, Sawtooth Coriander, Recao (Puerto Rico), Ngo Gai (Vietnam), and Chadon Beni (Trinidad & Tobago), its distinctive flavor is essential for authentic dishes like Puerto Rican Sofrito (often called Recaíto when culantro is prominent). Finding fresh culantro can be challenging in supermarkets outside specific regions, like here in Southern Ontario, but thankfully, cultivating it at home is achievable with the right approach.
This guide provides comprehensive, step-by-step instructions for successfully growing culantro from seeds, seedlings, and cuttings, covering both indoor and outdoor cultivation. We’ll delve into essential care, proper harvesting techniques, effective storage methods, and troubleshooting common challenges, ensuring you feel confident and equipped for a successful culantro growing experience.
I. Understanding Culantro: More Than Just Strong Cilantro
1. Botanical Background and Origins
Culantro (Eryngium foetidum) is a tropical herb native to the Americas, specifically Mexico, Central, and South America, and the Caribbean. It belongs to the Apiaceae family, sharing lineage with familiar plants like carrots, parsley, celery, and indeed, cilantro. While sharing some flavor compounds with cilantro, culantro possesses a much more potent, pungent aroma and taste that is less soapy to those with a genetic aversion to cilantro. Its robust flavor profile makes it indispensable in many global cuisines. Remember its many names – Mexican Coriander, Sawtooth Coriander, Recao, Ngo Gai, Chardon Beni – as they reflect its widespread use.
| Specification | Details |
|---|---|
| Plant Type | Herbaceous Biennial/Perennial (often grown as an Annual) |
| Scientific Name | Eryngium foetidum |
| Family | Apiaceae (Carrot/Parsley family) |
| Growth Habit | Forms a basal rosette of leaves; sends up flower stalk later |
| Mature Size | Rosette 8-12 inches (20-30 cm) wide; Flower stalk 1-2 feet (30-60 cm) tall |
| Sunlight Requirements | Partial shade to full sun (afternoon shade is beneficial in hot climates) |
| Soil Requirements | Fertile, consistently moist, well-draining soil; pH 6.0-7.5 |
| Water Needs | Requires consistent moisture; do not allow to dry out completely |
| Ideal Temperature Range | Prefers warm temperatures: 70°F-85°F (21°C-29°C) |
| Hardiness Zones | Perennial in USDA zones 10-11; grown as an annual elsewhere |
| Planting Time | Spring (after last frost) in temperate climates; year-round in tropical regions |
| Spacing | 8-12 inches (20-30 cm) apart |
| Harvest Time | Approx. 60-90 days from seeding; when leaves reach usable size |
| Propagation Methods | Seeds (most common), root divisions (offsets), cuttings (less common but possible) |
### 2. Key Characteristics: What Makes Culantro Unique
Culantro is a visually distinct and hardy plant. Understanding its features helps in cultivation:
- Leaves: Long, lance-shaped, dark green leaves with distinctively serrated or “sawtooth,” slightly spiny edges. They grow from a central point, forming a ground-hugging rosette. The texture is somewhat tough or leathery compared to cilantro.
- Flavor & Aroma: Intensely aromatic with a strong cilantro-like flavor, but earthier and more pungent. Crucially, this flavor holds up well during cooking, unlike cilantro which is best added fresh.
- Growth Habit: Initially grows as a low rosette. Under stress (heat, drought, age) or specific day length cues, it will “bolt,” sending up a central flower stalk. It’s more heat-tolerant and slower to bolt than cilantro.
- Flowers: The flower stalk bears small, greenish-white flowers clustered in cone-like heads, typical of the Eryngium genus (Sea Hollies). While interesting, flowering signals the end of optimal leaf production. Removing flower stalks promptly can prolong the harvest period.

II. Getting Started: Propagating Culantro
You can start culantro in several ways, each with its own advantages.
1. Growing from Seeds: Patience Required!
a. Seed Selection and Germination Needs
- Seed Quality: Always start with fresh, high-quality seeds from a reputable supplier. Culantro seeds can have variable viability, so freshness matters. The seeds themselves are very small and dark – handle them carefully!
- Pre-Soaking (Optional but Recommended): To potentially speed up germination, you can soak the seeds in lukewarm water for 12-24 hours before sowing. This helps soften the hard seed coat. Pat them gently dry before handling.
- Critical Germination Conditions: Culantro seeds have two key requirements: - Light: They need light to germinate (they are photoblastic), so do not cover them with soil. Simply press them onto the soil surface. - Warmth & Moisture: Consistent warmth (ideally 75-85°F / 24-29°C) and constant surface moisture are crucial. A heat mat is highly recommended for reliable germination, especially indoors or in cooler climates.
b. Step-by-Step: Sowing Seeds Indoors
Starting indoors gives you better control over the germination environment.
- Fill seed trays, cell packs, or small pots with a sterile, fine-textured seed-starting mix. Using a sterile mix helps prevent “damping-off,” a fungal disease fatal to young seedlings. Consider peat-free mixes for a sustainable option. Moisten the mix *before* sowing.
- Carefully sprinkle or place 2-3 seeds onto the soil surface in each cell or pot. Remember, do not cover the seeds. Gently press them down to ensure good soil contact.
- Mist the surface thoroughly with water from a spray bottle. Avoid heavy watering that could dislodge the seeds.
- Cover the tray or pots with a clear plastic dome or plastic wrap to maintain high humidity. Vent slightly or remove the cover for an hour daily to allow air exchange.
- Place the container in a very warm location (use a heat mat set to 75-85°F / 24-29°C if possible) with bright, indirect light or under grow lights.
- Check daily to ensure the soil surface remains consistently moist – mist as needed. Be patient; germination can be slow and erratic.
- Remove the plastic cover once seedlings start emerging (typically 14-25 days, sometimes longer).
Germination Journey & Seedling Care
Culantro germination can test your patience, often taking 2 to 4 weeks. Once the tiny seedlings appear, provide strong light – about 12-16 hours daily under grow lights positioned a few inches above them, or in a bright windowsill (though supplemental light is often better). Keep the soil consistently moist but not waterlogged. Once seedlings have developed their first set of true leaves (these look like miniature versions of the adult leaves, distinct from the initial seed leaves or cotyledons) and are sturdy enough to handle (perhaps 1-2 inches tall), thin each cell/pot to the single strongest seedling by snipping the others at the soil line. They are ready for transplanting when they have 2-3 sets of true leaves.
### 2. Using Seedlings: A Head Start
a. Why Start with Seedlings?
- Purchasing or starting seedlings gives you a significant head start, bypassing the sometimes tricky germination phase.
- This is particularly advantageous in regions with shorter growing seasons, ensuring plants mature before cooler weather arrives.
- You begin with established plants that are generally more robust.
b. Hardening Off: Preparing Seedlings for Outdoors (CRITICAL STEP!)
Seedlings started indoors or in a greenhouse are accustomed to stable conditions. They must be gradually acclimated to outdoor elements (sun, wind, temperature fluctuations) to prevent transplant shock (wilting, scorching, or death).
- About 7-10 days before your target outdoor planting date (after all frost danger has passed), start placing seedlings outdoors in a sheltered, shady spot for 1-2 hours.
- Gradually increase the duration outdoors and the amount of direct sunlight they receive each day.
- Bring them back indoors or provide protection if temperatures drop significantly or strong winds occur.
- By the end of the hardening-off period, seedlings should be able to tolerate conditions in their final planting location.
c. Transplanting Seedlings into Pots or Garden Beds
- Choose healthy, well-hardened seedlings with several sets of true leaves. Ensure the state of the seedling is vigorous, not leggy or stressed.
- Prepare the destination: Amend garden beds with compost or aged manure for fertility and drainage. For pots, use a high-quality potting mix enriched with compost. Ensure pots have drainage holes.
- Water the seedlings well about an hour before transplanting to hydrate the root ball.
- Gently remove each seedling from its container, disturbing the roots as little as possible.
- Dig holes in the prepared soil slightly larger than the root ball, spaced 8-12 inches (20-30 cm) apart.
- Place the seedling in the hole so the top of its root ball is level with the surrounding soil surface. Planting too deep can lead to stem rot.
- Backfill the hole gently, firming the soil around the base of the plant.
- Water thoroughly immediately after transplanting to settle the soil and minimize transplant shock.
d. Initial Care After Transplanting
- Watering: Keep the soil consistently moist, especially during the first couple of weeks as the plants establish. Check the soil daily.
- Mulching: Once established, apply a 1-2 inch layer of organic mulch (shredded leaves, straw, compost) around the plants, keeping it slightly away from the base. This conserves moisture, suppresses weeds, and keeps roots cool.
- Protection (if needed): Shield young transplants from harsh sun, strong winds, or unexpected cold snaps for the first few days using row covers or temporary shading.
3. Propagating from Cuttings or Divisions: Less Common but Possible
a. Why Use Cuttings or Divisions?
- Faster Results: Can be quicker than starting from seed, especially if you have access to a mature plant.
- Genetic Clone: Guarantees the new plant will be identical to the parent, preserving specific desirable traits. Divisions are particularly effective as you are separating established plantlets.
b. Taking Cuttings (Less Reliable)
While not the primary method, you can try rooting cuttings:
- Select a healthy, vigorous side shoot or a smaller offset from the base of a mature plant. Look for a stem section 3-4 inches long.
- Use clean, sharp snips to take the cutting. Remove the lower leaves, leaving just a few at the top to reduce water loss (transpiration).
- (Optional) Dip the cut end in rooting hormone powder.
- Insert the cutting into a small pot filled with moist potting mix or perlite/vermiculite mix. Ensure at least one node (where leaves were attached) is below the soil line, as roots often emerge from nodes.
- Cover with a plastic bag or dome to maintain high humidity. Place in bright, indirect light. Keep the medium moist. Roots may develop in several weeks.
c. Rooting Divisions (Offsets – More Reliable)
Mature culantro plants often produce small plantlets or “offsets” around the base. Dividing these is a more reliable propagation method:
- Carefully dig up a mature, healthy culantro plant.
- Gently separate the smaller offsets from the main plant, ensuring each division has some roots attached. Use a clean knife if necessary to cut connecting tissues.
- Immediately replant the divisions into prepared pots or garden beds, following the same transplanting steps as for seedlings (Section II.2.c).
- Water well and provide initial care as you would for transplants. The state of the division should be a small but complete plantlet with leaves and roots.
d. Transplanting Rooted Cuttings/Divisions
Once cuttings have developed a healthy root system (check gently after a few weeks) or divisions are separated, transplant them carefully into their final location (larger pots or garden beds), following the spacing and care guidelines outlined for seedlings (Section II.2.c & II.2.d).
III. Planting Culantro: Finding the Right Spot
1. Planting Outdoors in the Garden
a. Choosing the Ideal Location
- Light: Culantro thrives in partial shade, especially afternoon shade in hot climates (USDA Zones 8+). While it tolerates full sun, especially in cooler regions, excessive heat and direct sun can lead to tougher leaves and premature bolting. Morning sun is generally ideal.
- Soil: Needs fertile, humus-rich soil that drains well but stays consistently moist. Avoid heavy clay or sandy soils unless amended heavily with organic matter. Aim for a soil pH between 6.0 and 7.5.
- Location: Choose a spot protected from strong winds if possible.
b. Preparing the Garden Bed
- Loosen the soil to a depth of 8-12 inches (20-30 cm) using a digging fork or tiller.
- Incorporate generous amounts (2-4 inches) of compost, well-rotted manure, or other rich organic matter. This improves soil structure, fertility, and water retention – key for happy culantro.
- Rake the surface smooth, removing any rocks or debris. Ensure the bed drains well; consider raised beds if drainage is poor.
c. Planting Your Culantro
- Ensure seedlings/divisions are properly hardened off (Section II.2.b).
- Space plants 8-12 inches (20-30 cm) apart. Closer spacing can work in containers but allow adequate room for air circulation in garden beds to reduce disease risk.
- Plant at the same depth they were growing in their previous containers, ensuring the crown (where leaves emerge) is not buried.
- Firm the soil gently around the base and water thoroughly.
d. Climate Considerations for Planting Time
- Temperate Climates: Plant outdoors only after all danger of frost has passed and nighttime temperatures reliably stay above 50°F (10°C). Starting seeds indoors 6-8 weeks before the last frost date is recommended.
- Tropical/Subtropical Climates: Can often be planted year-round. However, planting during slightly cooler, wetter periods might reduce stress and encourage better establishment than planting in peak heat and dryness.
e. Initial Care & Establishment
- Focus on consistent watering to keep the soil moist but not saturated.
- Apply organic mulch once plants show new growth.
- Monitor for pests and signs of stress during the initial establishment phase.
2. Growing Culantro Indoors in Containers
a. Selecting Containers and Growing Medium
- Containers: Choose pots at least 6-8 inches (15-20 cm) deep and wide, with excellent drainage holes. Terracotta pots can dry out quickly; plastic or glazed ceramic may retain moisture better.
- Soil Mix: Use a high-quality, well-draining potting mix. Enhance it by incorporating about 20-30% compost or worm castings for added nutrients and moisture retention. Avoid using garden soil, which compacts easily in pots. A peat-free mix is a sustainable choice.
b. Light, Temperature, and Humidity Indoors
- Light: Provide at least 6 hours of bright, indirect light daily. A south-facing window might work, but direct, intense sun through glass can scorch leaves. Supplementing with LED or fluorescent grow lights (12-16 hours/day) is often necessary for robust growth indoors. Rotate pots regularly for even exposure.
- Temperature: Maintain average room temperatures between 70-85°F (21-29°C). Avoid placing plants near cold drafts, heating vents, or radiators. Nighttime temperatures should ideally stay above 50°F (10°C).
- Humidity: Culantro appreciates higher humidity than typical indoor environments offer. Group plants together, use a pebble tray filled with water (ensuring pot bottom isn’t submerged), or run a small humidifier nearby. Misting leaves occasionally can also help temporarily.
c. Watering and Feeding Indoor Culantro
- Watering: Check the soil moisture frequently. Water thoroughly when the top inch of soil feels dry to the touch. Allow excess water to drain away completely; do not let the pot sit in a saucer full of water, as this leads to root rot.
- Fertilizing: Feed every 4-6 weeks during the active growing season (spring/summer) with a balanced, water-soluble liquid fertilizer diluted to half-strength. Organic options like fish emulsion or compost tea can also be used. Reduce feeding in fall/winter when growth slows.
d. Advantages of Indoor Cultivation
- Provides a year-round supply of fresh culantro, independent of outdoor climate.
- Offers better control over the growing environment (light, temp, water).
- Reduces exposure to many outdoor pests and diseases.
- Ideal for small spaces like apartments or balconies.
IV. Ongoing Care and Maintenance for Thriving Plants
1. Watering Wisely
- The golden rule for culantro is consistently moist, but never waterlogged soil. It mimics its tropical origins where soil stays damp.
- Check the soil moisture regularly – daily in hot weather or for container plants. Water deeply when the top inch feels dry.
- Water at the base of the plant (soil level) rather than overhead to keep foliage dry and reduce fungal disease risk. Early morning watering is often best.
- Adjust watering frequency based on weather, plant size, and container type. Plants in porous terracotta pots or during hot, windy weather will need water more often. Consider using collected rainwater as a sustainable option.
2. Fertilization Strategy
- Culantro isn’t a heavy feeder but appreciates consistent nutrients for lush leaf production.
- For garden plants, amending the soil well with compost at planting time might suffice. If growth seems slow or leaves look pale, supplement with a balanced organic fertilizer or compost tea mid-season.
- For container plants, regular feeding is more crucial as nutrients leach out. Use a balanced liquid fertilizer (organic options like fish emulsion/seaweed blend are excellent) every 4-6 weeks during active growth, usually diluted to half the recommended strength.
- Avoid over-fertilizing, which can harm plants. Look for signs like leaf tip burn (excess salts) or weak, leggy growth.
3. The Benefits of Mulching
- Applying a 1-2 inch layer of organic mulch (shredded leaves, straw, compost, wood chips) around outdoor plants (and even on the soil surface of indoor pots) is highly beneficial.
- Conserves Moisture: Reduces evaporation from the soil surface.
- Suppresses Weeds: Blocks light needed for weed germination.
- Regulates Soil Temperature: Keeps roots cooler in summer and warmer in cooler weather.
- Improves Soil: Organic mulches slowly decompose, adding nutrients and improving soil structure over time.
- Keep mulch a couple of inches away from the plant’s base (crown) to prevent moisture buildup and potential rot. Replenish as it breaks down.
V. Harvesting and Enjoying Your Culantro
1. When and How to Harvest
- Begin harvesting when plants are well-established and leaves are a usable size, typically 8-12 weeks after seeding. Harvest individual leaves rather than the whole plant to encourage continuous production.
- Harvest in the morning after the dew has dried, if possible. This is when the concentration of flavorful essential oils is highest.
- Using clean scissors or snips, cut the outermost, mature leaves at the base, leaving the central growing point (the inner rosette) undisturbed. This “cut-and-come-again” method allows the plant to keep producing new leaves from the center.
- Harvest regularly (e.g., weekly or bi-weekly depending on growth) even if you don’t need the leaves immediately. This encourages bushier growth and helps delay bolting (sending up a flower stalk). If a flower stalk appears and you want continued leaf production, snip it off at the base promptly.
- Handle leaves gently; the edges can be somewhat prickly. Wearing gloves might be comfortable for some. The state of harvested leaves should be vibrant green and firm.
2. Processing and Handling Fresh Leaves
- Rinse harvested leaves thoroughly under cool running water to remove any soil, debris, or small insects.
- Gently pat the leaves dry with a clean kitchen towel or use a salad spinner. Excess moisture will hasten spoilage during storage.
3. Storing Your Harvest
- Short-Term (Refrigerator): Wrap the dried leaves loosely in a paper towel (to absorb excess moisture) and place them inside a zip-top bag or airtight container. Store in the crisper drawer of your refrigerator. They should stay fresh for 5-10 days. Alternatively, place the stems (if attached) in a jar with a little water like a bouquet, cover loosely with a plastic bag, and refrigerate.
- Long-Term (Freezing – Best for Flavor): Freezing preserves the flavor better than drying. - Chop the fresh, clean leaves finely. - Pack the chopped culantro into ice cube trays. You can either pack tightly on its own, cover with a small amount of water, or cover with olive oil. - Freeze until solid, then transfer the culantro cubes to labeled freezer bags or containers. They will keep for several months (6+). Use directly from frozen in cooked dishes like soups, stews, or sofrito. - Alternatively, spread chopped leaves on a baking sheet, freeze until solid, then transfer to a freezer bag.
- Drying (Flavor Changes): Culantro can be dried, but its flavor becomes significantly less intense and somewhat different. Air-dry leaves in a warm, dark, well-ventilated place until brittle, or use a food dehydrator on a low setting. Store the dried, crumbled leaves in an airtight container away from light. Best used in cooked dishes where a milder background note is desired.
- Storing effectively reduces food waste and lets you enjoy your harvest long after the growing season.
VI. Troubleshooting, Tips, Pests & Diseases, and FAQ
1. Solving Common Culantro Problems
a. Slow Growth or Weak Plants? Check the Basics:
- Insufficient Light: Especially indoors, ensure adequate bright light (consider grow lights). Outdoors, ensure it’s not in deep shade.
- Nutrient Deficiency: Pale leaves or slow growth can indicate a need for fertilizer. Apply a balanced liquid feed (see IV.2). Ensure your soil or potting mix is fertile.
- Inconsistent Watering: Both overly dry soil and waterlogged conditions stress the plant. Aim for consistent moisture. Check drainage in pots and garden beds – root rot from poor drainage causes weak, yellowing plants.
- Temperature Stress: Too cold (below 50°F/10°C) or extreme heat can slow growth. Provide shade in intense heat.
b. Plant is Flowering (Bolting)! What to Do?
- Bolting (sending up a flower stalk) is natural, often triggered by heat, drought stress, or plant maturity/day length. Once it bolts heavily, leaf quality declines (becomes tougher).
- Action: Snip off flower stalks as soon as they appear at the base to redirect energy back to leaf production. Regular harvesting also helps delay bolting.
- Prevention: Provide consistent moisture, afternoon shade in hot climates, and harvest regularly.
c. Leaves are Tough or Too Spiny?
- Cause: Often due to excessive direct sun, heat stress, or plant maturity (older leaves are naturally tougher).
- Solution: Grow in partial shade, especially avoiding harsh afternoon sun. Maintain consistent soil moisture. Harvest leaves when they are mature but still relatively young and tender.
2. Pro Tips for Culantro Success
a. Getting a Head Start in Cooler Climates
- Start seeds indoors 6-8 weeks before your last expected frost date. Use a heat mat for best germination.
- Harden seedlings off carefully (Section II.2.b) before transplanting outdoors after nighttime temperatures are reliably above 50°F (10°C).
b. Adapting to Your Climate
- Hot Climates (Zones 8+): Prioritize afternoon shade. Mulch heavily to keep roots cool and moist. Expect bolting during peak summer; succession planting (starting new batches every few weeks) can ensure a continuous supply.
- Temperate Climates: Grow as a summer annual. Provide protection from late spring or early fall chills if needed. Maximize the growing season by starting indoors.
- Cooler Climates: Container growing (indoors or moved indoors for winter) is often the best strategy for a longer harvest season. Ensure sufficient light if growing indoors year-round.
c. Consider Different Accessions (Varieties)
- While not as varied as some herbs, slight differences in leaf size, vigor, and potentially heat tolerance might exist between seed sources or landraces. If possible, try seeds from different suppliers known for tropical plants. Sourcing locally adapted seeds or trading with other gardeners can sometimes yield plants better suited to your conditions. Look for suppliers specializing in ethnic or tropical vegetables.
d. Key Takeaways for Healthy Growth:
- Consistent Moisture: Don’t let it dry out, don’t let it drown.
- Good Light: Bright, but preferably indirect or partial shade in heat.
- Fertile, Well-Drained Soil: Amend generously with organic matter.
- Regular Harvesting: Encourages growth and delays bolting.
- Mulch Matters: Conserves water, regulates temperature, feeds soil.
3. Managing Pests and Diseases Sustainably
Culantro is relatively hardy, but issues can arise. An Integrated Pest Management (IPM) approach focuses on prevention and using the least toxic methods first.
a. Potential Pests
- Snails and Slugs: Chew holes in leaves, especially in damp conditions. Damage: Ragged holes, slime trails. Control: Handpick at night/early morning; use barriers (copper tape, crushed eggshells, diatomaceous earth – DE); employ organic baits (iron phosphate) cautiously.
- Aphids: Small, pear-shaped insects, often clustered on new growth or undersides of leaves. Damage: Suck sap, causing yellowing, distortion; excrete sticky honeydew. Control: Strong water spray; insecticidal soap; neem oil; encourage beneficial insects (ladybugs, lacewings).
- Spider Mites: Tiny arachnids, hard to see. Damage: Fine webbing, stippled (speckled) yellowing leaves. Thrive in hot, dry conditions. Control: Increase humidity; spray forcefully with water; use insecticidal soap or horticultural oil (like neem).
- Leaf Miners: Larvae tunnel within leaves. Damage: Winding, whitish trails inside leaf tissue. Control: Remove affected leaves immediately; use row covers on young plants; neem oil can have some effect.
- Note: Flea beetles and Mustard bugs mentioned in the original are less common specific pests of Culantro compared to the above, but generalist feeders could potentially cause damage. Similar controls (row covers, DE, soap/neem) apply.
b. Sustainable & Natural Pest Control Strategies
- Promote Beneficial Insects: Plant flowers like alyssum, dill, or fennel nearby to attract ladybugs, lacewings, hoverflies, and parasitic wasps that prey on pests. Avoid broad-spectrum pesticides that harm these allies.
- Companion Planting: Interplanting with aromatic herbs like basil, mint (in containers to control spread!), or marigolds *may* help deter some pests, though scientific evidence varies. Diversity is generally good.
- Neem Oil: Broad-spectrum organic insecticide, fungicide, and miticide. Disrupts insect feeding and growth. Follow label directions carefully; apply in evenings to avoid harming pollinators.
- Insecticidal Soap: Kills soft-bodied insects (aphids, mites) on contact by disrupting cell membranes. Requires thorough coverage. Safe for most beneficials once dry.
- Physical Barriers: Row covers protect young plants from flying insects. Handpicking is effective for larger pests like slugs.
- Healthy Plants Resist Pests: Providing optimal growing conditions (water, light, nutrients) makes plants less susceptible to attack.
c. Preventing and Treating Diseases
- Improve Air Circulation: Ensure proper spacing (8-12 inches) between plants. Prune dense growth if necessary (though usually not needed for rosette stage).
- Water Smart: Water at the soil level, not overhead, especially in humid conditions or evenings. Wet foliage encourages fungal diseases like powdery mildew or leaf spot.
- Garden Hygiene (Sanitation): Remove and dispose of diseased plant parts promptly. Clean up plant debris at the end of the season. Keep weeds down, as they can harbor pests and diseases. Use clean tools.
- Crop Rotation (Garden Beds): Avoid planting culantro (or related Apiaceae family members like cilantro, parsley, carrots) in the exact same spot year after year. This helps break disease cycles in the soil.
- Common Diseases: Fungal leaf spots or root rot (from overwatering/poor drainage) are most likely. Treatment: For fungal issues, remove affected leaves; improve air circulation; use organic fungicides (copper or sulfur-based, follow labels strictly) as a last resort if infection is severe. Ensure good drainage to prevent root rot. Bacterial leaf spot can also occur; similar prevention applies (avoid overhead watering, ensure spacing).
4. Frequently Asked Questions (FAQ)
How much water does culantro really need?
It needs consistently moist soil, similar to a damp sponge – never completely dry, never soggy. Check the top inch of soil; if it’s starting to feel dry, water thoroughly. Frequency depends heavily on weather and pot size.
Can I really grow culantro indoors all year?
Yes, absolutely! The key challenges are providing enough light (grow lights are often essential) and sufficient humidity. With proper care, you can have fresh culantro anytime.
What’s the best soil for culantro?
It loves fertile, rich soil that holds moisture but also drains well. Amend garden beds heavily with compost. For pots, use a quality potting mix amended with compost or worm castings. pH should be roughly neutral (6.0-7.5).
How do I stop pests without chemicals?
Focus on prevention: healthy plants, good air circulation, sanitation. Use physical methods like handpicking or water sprays. Encourage beneficial insects. Employ organic options like insecticidal soap or neem oil when necessary.
When is the absolute best time to harvest culantro leaves?
Harvest mature outer leaves anytime once the plant is established (8-12 weeks old). For peak flavor, harvest in the morning. Regular harvesting (cutting outer leaves) is key to keeping the plant productive and delaying flowering.
Will culantro grow in full shade?
No, it needs light. Deep shade will result in weak, leggy growth. It *prefers* partial shade, especially protection from intense afternoon sun in hot climates, but requires several hours (at least 4-6) of bright light daily.
Does culantro bolt as fast as cilantro?
No, culantro is significantly more heat-tolerant and slower to bolt than most cilantro varieties, making it a great summer alternative. However, it will eventually bolt, especially under stress or with age.
What’s the easiest way to tell culantro and cilantro apart visually?
Cilantro has delicate, feathery, lobed leaves resembling flat-leaf parsley. Culantro has long, strap-like, dark green leaves with distinctly serrated (“sawtooth”) edges, growing in a ground-hugging rosette. The texture is also much tougher.
How do I keep my harvested culantro fresh the longest?
For short-term (up to 10 days), rinse, dry thoroughly, wrap in a paper towel, and store in a bag/container in the fridge crisper. For long-term flavor preservation, chop and freeze in ice cube trays with water or oil.
Comments (0)
No comments yet. Be the first to share your thoughts.