 Skip to content
Your Complete Guide to Growing Ashitaba in Home Garden
Ashitaba (Angelica keiskei Koidzumi), a fascinating herbaceous perennial native to Japan’s Izu Islands, is celebrated for its remarkable ability to
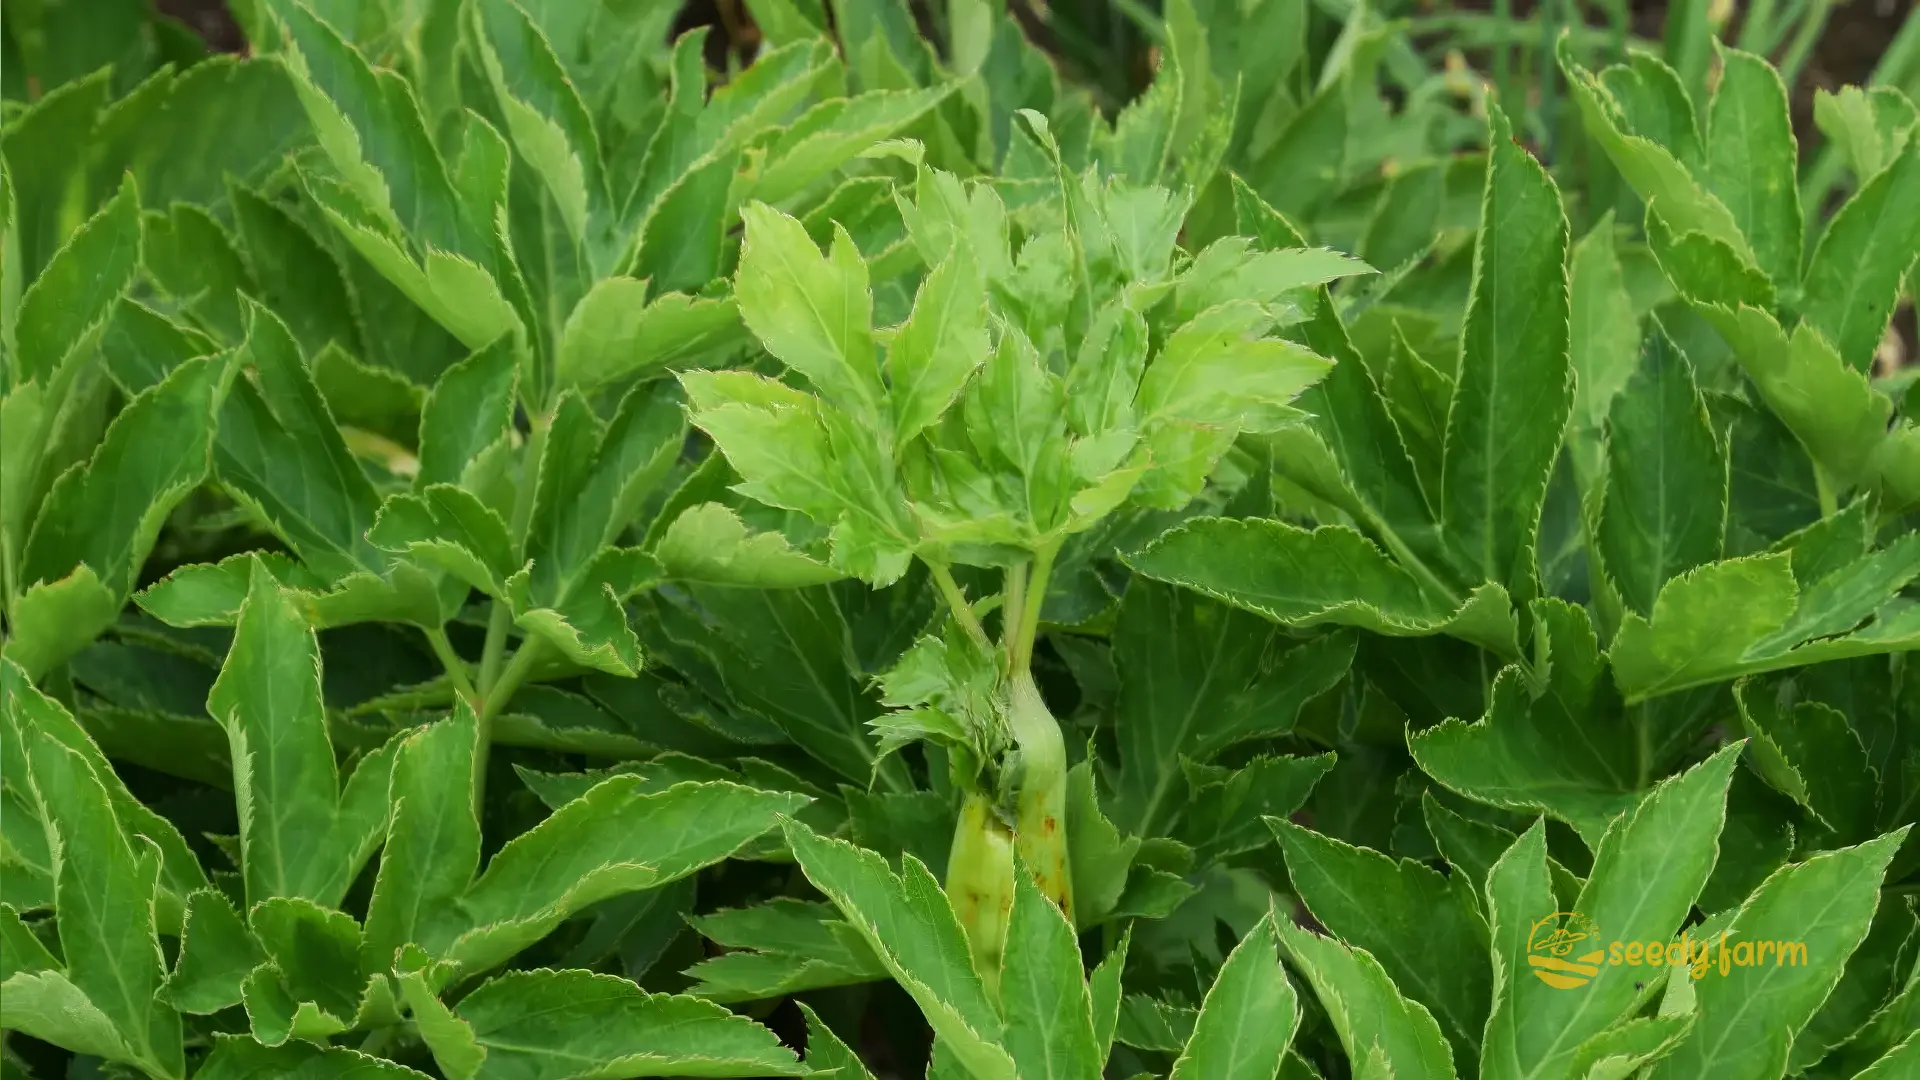
*Ashitaba (Angelica keiskei Koidzumi)*, a fascinating herbaceous perennial native to Japan’s Izu Islands, is celebrated for its remarkable ability to regenerate and its long history of use. Aptly nicknamed “Tomorrow’s Leaf” because a harvested leaf is said to be replaced by a new one overnight, this plant is a member of the Apiaceae family, which also includes familiar plants like carrots, parsley, and celery. Ashitaba features large, dark green, glossy leaves divided into leaflets, and produces umbels (umbrella-like clusters) of small, greenish-white flowers, typically in its second or third year. When a stem or leaf is cut, it often exudes a distinctive yellow sap.
Ashitaba is valued not only for its culinary potential in various dishes but also for its rich nutritional profile, containing a range of vitamins, minerals, and unique antioxidant compounds known as chalcones. Traditionally, it holds a significant place in Japanese folk medicine, believed to support overall wellness, although scientific validation of specific health benefits is ongoing.
Growing Ashitaba can be a truly rewarding experience, providing a fresh supply of this unique plant right from your garden or containers. Whether you’re a seasoned horticulturist or just starting your gardening journey, this guide provides the essential knowledge to successfully cultivate Ashitaba. We’ll cover everything from understanding its needs and starting from seed to ongoing care, harvesting techniques, and troubleshooting common challenges, ensuring your Ashitaba thrives.
I. Ashitaba Plant Information
1. Description and Characteristics
| Specification | Details |
|---|---|
| Plant Type | Herbaceous perennial (may act as a biennial in some conditions) |
| Family | Apiaceae (Carrot/Parsley family) |
| Growth Habit | Upright, clumping, can become somewhat spreading |
| Mature Height | Typically 2-4 feet (60-120 cm), can reach 5 feet (150 cm) when flowering |
| Sunlight Requirements | Full sun to partial shade (prefers partial shade in hot climates) |
| Soil Requirements | Rich, fertile, consistently moist, yet well-draining soil; slightly acidic to neutral pH (6.0-7.0) |
| Water Needs | Requires consistently moist soil; do not allow to dry out completely |
| Temperature Range | Prefers cool, moist conditions. Hardy in USDA Zones 7-10; may survive Zone 6 with winter protection (mulch). Can struggle in prolonged high heat (above 85°F / 29°C). |
| Planting Time | Spring or early fall |
| Spacing | 2-3 feet (60-90 cm) apart to allow for mature size and air circulation |
| Propagation | Primarily by seed; division of established clumps is possible but less common |
| Harvest Time | Leaves and stems can be harvested throughout the growing season once established |
| Leaves | Large, dark green, glossy, compound leaves divided into leaflets; often evergreen in milder climates, may die back in colder zones. |
| Flowers | Small, greenish-white flowers arranged in large compound umbels, typically appearing in the second or third year during summer. |
| Unique Features | Rapid leaf regeneration; distinctive yellow sap (latex) when cut. |
### 2. Health Benefits and Traditional Uses
- Nutritional Powerhouse: Ashitaba is packed with essential nutrients, including vitamins (notably Vitamin K, Vitamin A, Vitamin C, and B vitamins), minerals (like potassium and calcium), fiber, and potent antioxidants.
- Traditional Significance: Deeply rooted in Japanese traditional medicine, it has been historically used to support vitality, digestion, and overall well-being. It’s often consumed as a vegetable or brewed into tea.
- Unique Compounds: Contains specific chalconoids (xanthoangelol and 4-hydroxyderricin) found primarily in its yellow sap. These compounds are the focus of much scientific interest regarding potential health-promoting properties. Note: While traditionally valued, consult healthcare professionals for medical advice.
- Culinary Uses: Young leaves and stems can be eaten raw in salads (though they have a distinct flavour some find slightly bitter), added to smoothies, stir-fries, soups, or prepared as tempura. The flavour is often described as similar to celery with a slightly herbaceous, sometimes bitter note.
Approximate Nutritional Value of Raw Ashitaba Leaves (per 100g) Note: Values can vary based on growing conditions, variety, and harvest time. This table provides representative figures compiled from various sources.
| Nutrient | Approximate Amount |
|---|---|
| Calories | 30 – 40 kcal |
| Protein | 2 – 3 g |
| Fat | 0.3 – 0.6 g |
| Carbohydrates | 5 – 8 g |
| Dietary Fiber | 3 – 5 g |
| Vitamin K | Very High (~500 mcg) |
| Vitamin A (from Beta-carotene) | High (~3000-5000 IU or equivalent RAE) |
| Vitamin C | Moderate to High (~20-40 mg) |
| Vitamin E | Moderate |
| Vitamin B2 (Riboflavin) | Moderate |
| Folate (Vitamin B9) | Moderate |
| Potassium | High (~400-600 mg) |
| Calcium | Moderate (~150-250 mg) |
| Iron | Moderate (~1-2 mg) |
| Magnesium | Moderate |
| Chalconoids (e.g., Xanthoangelol) | Present (Amounts variable, concentrated in sap) |
## II. Seed Germination and Planting
1. Seed Viability and Germination Process
Ashitaba seeds possess relatively short viability, meaning their ability to sprout decreases significantly over time. Freshly harvested seeds generally offer the best germination rates. If using seeds that have been stored, be prepared for potentially lower or slower germination. While fresh seeds often germinate readily without special treatment, older or stored seeds may benefit from a period of cold stratification. This involves mixing the seeds with slightly damp sand or peat moss, placing them in a sealed bag or container, and refrigerating (not freezing) at around 40°F (4°C) for 3-4 weeks before sowing. This mimics natural winter conditions and can help break dormancy.
 Regardless of freshness, sow seeds shallowly (about 1/8 inch or 3mm deep) or simply press them onto the surface of the soil, as some light can aid germination. Maintain consistent moisture – the soil surface should never fully dry out. Germination can be slow and sometimes erratic, typically taking 3 to 5 weeks, potentially longer in cooler conditions. Crucially, high humidity is beneficial during this phase. Using a propagation tray with a clear plastic dome, or covering pots with plastic wrap (with a few ventilation holes), helps maintain the necessary moisture around the seeds. Aim for a soil temperature between 60-70°F (15-21°C) for optimal germination.
2. Ideal Soil Conditions
Ashitaba thrives in soil that is rich in organic matter, mimicking its native volcanic slopes. A good soil mix should be both fertile and well-draining to prevent waterlogging, which can lead to root rot.
- Amendments: Generously incorporate well-rotted compost or aged manure into your garden beds before planting. For containers, use a high-quality potting mix blended with about 20-30% compost or worm castings.
- Drainage: Ensure good drainage, especially in clay soils. Adding perlite, coarse sand, or fine gravel to your potting mix or garden bed can significantly improve drainage and aeration, creating a light, fluffy texture that roots love. Raised beds can also be an excellent solution in areas with heavy soil.
- Sustainable Boost: Consider adding biochar to your soil mix. Biochar improves soil structure, water retention, and nutrient availability over the long term, while also sequestering carbon.
3. Choosing the Right Planting Location
Selecting the right spot is key to Ashitaba’s success:
- Sunlight: In cooler climates (e.g., USDA Zones 7-8), Ashitaba can often tolerate full sun, especially if the soil remains consistently moist. However, in regions with hot summers and intense afternoon sun (e.g., Zone 9-10 or hotter regions like Southern California), providing partial shade or dappled sunlight, particularly during the hottest part of the day, is crucial to prevent leaf scorch and stress. Morning sun with afternoon shade is often ideal.
- Acclimatization: If moving seedlings started indoors or in shade to a sunnier location, do so gradually over a week or two. This process, known as ‘hardening off’, allows the plant to adjust to increased light intensity, temperature fluctuations, and wind without shock. Start with an hour or two of direct sun (preferably morning sun) and increase the duration daily.
- Shelter: While tolerant of some wind, providing shelter from strong, drying winds can be beneficial, especially in coastal or exposed areas.
4. Detailed Planting Steps (from Seed)
- Prepare Containers/Trays: Fill seed trays or small pots (around 3-4 inches / 7-10 cm) with a fine, well-draining seed-starting mix. Moisten the mix thoroughly before sowing, allowing excess water to drain.
- Sow Seeds: Sow seeds thinly on the soil surface, pressing them gently to ensure good contact, or cover very lightly with about 1/8 inch (3mm) of mix. Water gently with a fine spray to avoid dislodging the seeds.
- Maintain Humidity & Warmth: Cover the trays or pots with a humidity dome or clear plastic wrap. Place them in a warm location (60-70°F / 15-21°C) with bright, indirect light. Avoid direct sunlight at this stage, which can overheat the containers.
- Monitor & Ventilate: Check daily to ensure the soil remains consistently moist (like a wrung-out sponge). Mist lightly if needed. Once seedlings begin to emerge (remember, this can take several weeks!), gradually increase ventilation by propping open the dome slightly or removing the plastic wrap for longer periods each day. This helps acclimate seedlings to ambient humidity and prevents fungal diseases (‘damping off’).
- Transplanting: Once seedlings have developed at least two sets of true leaves (the leaves that appear after the initial seed leaves or cotyledons) and are large enough to handle carefully, they are ready for transplanting. Handle them gently by their leaves, not the delicate stems. Transplant into individual larger pots (at least 6-8 inches / 15-20 cm diameter initially) or directly into their final garden position if weather permits and the soil has warmed. For final planting, choose containers at least 12-18 inches (30-45 cm) in diameter or space plants 2-3 feet (60-90 cm) apart in the garden.
- Planting Out: Prepare the final planting site or larger pots by incorporating ample organic matter (compost) and ensuring good drainage. Plant the seedlings at the same depth they were growing in their previous containers. Water thoroughly after transplanting to settle the soil around the roots. If moving to a sunnier spot, remember to harden off the plants first (see step 3).
III. Care and Maintenance
1. Watering Wisdom
Consistent moisture is paramount for Ashitaba. The soil should feel moist like a well-wrung sponge, but never saturated or waterlogged.
- Frequency: Water whenever the top inch (2.5 cm) of soil begins to feel dry to the touch. This might mean daily watering during hot, dry weather, especially for container plants, and less frequently during cooler periods.
- Method: Water deeply at the base of the plant to encourage deep root growth, rather than frequent shallow watering. Avoid overhead watering if possible, as wet foliage can encourage fungal diseases. Early morning watering is generally best.
- Drainage Check: Double-check that pots have drainage holes and that garden beds drain well after heavy rain. Standing water is detrimental.
- Mulching (Sustainability Tip): Apply a 2-3 inch (5-7 cm) layer of organic mulch (such as shredded bark, straw, or compost) around the base of the plant (leaving a little space around the stem). Mulch helps conserve soil moisture, suppresses weeds, regulates soil temperature, and slowly adds organic matter as it decomposes.
2. Fertilizing for Healthy Growth
Ashitaba is a relatively heavy feeder and appreciates fertile soil to support its lush growth.
- Organic Approach (Recommended): Top-dress the soil around the plants with a layer of fresh compost or well-rotted manure every 1-2 months during the active growing season (spring through fall). Alternatively, apply a balanced organic liquid fertilizer, such as fish emulsion or kelp meal diluted according to package instructions, every 4-6 weeks. Worm castings are also an excellent gentle fertilizer.
- Conventional Fertilizers: If using synthetic fertilizers, opt for a balanced formula (e.g., 10-10-10) and apply sparingly, following product directions carefully. Over-fertilizing, especially with high-nitrogen fertilizers, can lead to weak, floppy growth that’s more susceptible to pests and diseases.
- Nutrient Balance: Ensure the plants receive a good mix of macro and micronutrients for robust health and optimal production of beneficial compounds. Healthy soil rich in organic matter usually provides this.

3. Adapting to Climate and Light
Ashitaba’s performance is closely tied to its environment:
- Temperature Preferences: It thrives in cool, damp conditions, similar to its native coastal habitat. Growth may slow considerably during the peak heat of summer, especially in warmer zones. It can tolerate light frost, but prolonged freezing temperatures will kill the top growth. In colder zones (borderline Zone 6/7), provide heavy winter mulch to protect the roots for potential regrowth in spring.
- Light Management: As mentioned, while it needs adequate light (at least 4-6 hours of direct sun is often ideal in cooler areas), protection from intense afternoon sun is vital in hotter climates. Monitor your plants for signs of stress: pale or scorched leaves may indicate too much sun, while leggy growth with sparse leaves might mean too little light. Adjust location or provide shade cloth if needed.
4. Pruning and Maintaining Plant Health
a. Pruning Ashitaba Effectively
Pruning helps maintain plant shape, encourages bushy growth, and provides leaves for harvest.
- Harvesting as Pruning: The most common form of ‘pruning’ is regular harvesting. Cut outer, mature leaves and their stems (petioles) close to the base of the plant using clean, sharp scissors or pruners. This encourages the plant to produce new growth from the center. Avoid taking more than one-third of the plant’s leaves at any single time to allow for recovery.
- Removing Damaged Growth: Regularly inspect your plants and prune away any yellowing, dead, or damaged leaves and stems promptly. This improves appearance and prevents potential disease issues.
- Controlling Flowering: Ashitaba typically flowers in its second or third year. Flowering signals a shift in the plant’s energy from leaf production towards seed production, and the plant may decline or die after setting seed (acting like a biennial). If your primary goal is leaf harvest, you can prolong the plant’s vegetative state by removing flower stalks as soon as they begin to form. Cut them off near their base.
- Rejuvenation (Optional): If an older plant becomes leggy or less productive, you can try cutting it back more significantly (e.g., by about half) in early spring to stimulate fresh, vigorous growth from the base. Ensure the plant is healthy before attempting this.
- Tool Hygiene: Always use clean, sharp pruning tools. Disinfect blades with rubbing alcohol or a 10% bleach solution between cuts, especially if working with multiple plants or removing diseased tissue, to prevent spreading pathogens.
b. Promoting Overall Plant Health
- Air Circulation: Ensure adequate spacing between plants (2-3 feet / 60-90 cm) to allow for good air movement. This helps foliage dry quickly after rain or watering and reduces the risk of fungal diseases like powdery mildew.
- Regular Observation: Make it a habit to check your Ashitaba plants frequently (at least weekly) for early signs of pests (like aphids on new growth), diseases (like leaf spots or mildew), or nutrient deficiencies (like yellowing leaves). Early detection makes management much easier.
- Soil Health Focus (Sustainability Tip): Healthy plants start with healthy soil. Continuously build soil health by adding organic matter (compost, mulch) rather than relying solely on synthetic fertilizers. Healthy soil supports beneficial microbes that can help plants resist pests and diseases.
IV. Harvesting and Usage
1. When and How to Harvest
Harvesting Ashitaba is straightforward and can be done repeatedly throughout the growing season.
- Timing: Begin harvesting once the plant is well-established, typically a few months after planting or when it has a good number of healthy leaves. Harvesting in the morning, after the dew has dried but before the heat of the day, is often considered best, as the leaves are fully hydrated and potentially at their peak nutritional content.
- Method: Use sharp, clean scissors, shears, or a knife. Select the lower, outer, mature leaves. Cut the entire leaf stalk (petiole) back close to the main stem or base of the plant. This method encourages new growth from the plant’s crown. Remember the “Tomorrow’s Leaf” principle – regular, moderate harvesting stimulates regeneration.
- Sustainable Harvest: Avoid over-harvesting. As a general guideline, never remove more than about one-third of the plant’s total leaves at one time. Allow the plant sufficient foliage to photosynthesize and recover between harvests. If you have multiple plants, rotate harvesting among them.
- Harvesting Stems: Young, tender stems can also be harvested and used similarly to the leaves.
- Yellow Sap: Don’t be alarmed by the yellow sap that exudes from the cut surface; this is a characteristic feature of Ashitaba.
2. Preparing Ashitaba for Consumption
Freshly harvested Ashitaba can be used in various ways:
- Fresh Use: Thoroughly rinse the harvested leaves and stems under cool running water to remove any soil, debris, or small insects. Pat them dry gently with a clean kitchen towel or use a salad spinner. - Raw: Young, tender leaves can be chopped and added to salads or green smoothies. Be aware of their distinct, slightly celery-like, sometimes bitter flavour. Start with small amounts if new to the taste. - Cooked: Ashitaba leaves and stems can be lightly steamed, sautéed, stir-fried, added to soups, stews, or omelets, or battered and fried as tempura (a popular preparation in Japan). Cooking often mellows the flavour slightly.
- Drying for Tea or Powder: - Air Drying: Tie small bundles of leaves and stems together and hang them upside down in a warm, dry, dark, well-ventilated area until they are completely dry and crumbly (this may take several days to a week or more depending on humidity). - Dehydrator: Arrange leaves and stem pieces in a single layer on dehydrator trays. Dry at a low temperature setting (around 95-115°F / 35-45°C) until crisp. This is usually faster and more reliable than air drying.
- Grinding: Once thoroughly dried, the leaves and stems can be crushed by hand or ground into a powder using a clean coffee grinder, spice mill, or mortar and pestle. Store the powder promptly. Dried leaves or powder are commonly used to make Ashitaba tea or added to smoothies and other recipes.
3. Storage Techniques
Proper storage helps maintain the quality and freshness of your harvested Ashitaba.
- Fresh Leaves: For short-term storage (up to 3-5 days), wrap the rinsed and dried leaves loosely in a slightly damp paper towel and place them inside a perforated plastic bag or an airtight container in the refrigerator’s crisper drawer.
- Dried Leaves: Store whole or crumbled dried leaves in a labeled, airtight container (glass jars work well) in a cool, dark, dry place, such as a pantry or cupboard. Properly dried and stored leaves can retain good quality for several months, up to a year, though flavour and potency may gradually diminish.
- Powdered Ashitaba: Store the powder in a small, airtight container, away from light, heat, and moisture. For longer-term storage and best preservation of volatile compounds, consider storing the container in the refrigerator or freezer. Aim to use the powder within 6 months for optimal freshness.

V. Common Issues and Solutions
While generally robust, Ashitaba can encounter a few challenges. Here’s how to address them:
1. Germination Difficulties
- Problem: Low or No Germination. - Cause: Often due to old, non-viable seeds. Can also be caused by incorrect temperature, insufficient moisture, or sowing too deep. - Solution: Use the freshest seeds possible. Consider cold stratification for stored seeds (see Section II.1). Ensure consistent moisture (use a humidity dome), proper sowing depth (surface or barely covered), and maintain soil temperatures between 60-70°F (15-21°C). Be patient; germination can be slow (3-5 weeks+).
2. Environmental Stress Factors
- Problem: Leaf Scorch (Brown, Crispy Edges or Patches). - Cause: Too much direct, intense sunlight, especially afternoon sun in hot climates. Can also be exacerbated by insufficient water. - Solution: Provide partial shade, especially during the hottest part of the day. Use shade cloth if necessary. Ensure consistent watering. Acclimate plants gradually (‘harden off’) to brighter conditions.
- Problem: Slowed Growth or Wilting in Summer. - Cause: Heat stress; Ashitaba prefers cooler conditions. - Solution: Ensure adequate shade during hot periods. Maintain consistent soil moisture. Mulch well to keep roots cooler. Growth will naturally slow in high heat but should resume when temperatures cool.
- Problem: Frost Damage / Winter Dieback. - Cause: Exposure to freezing temperatures below its hardiness level. - Solution: In borderline zones (e.g., Zone 6/7), apply a thick layer of organic mulch (straw, shredded leaves) over the plant crown after the first hard frost to insulate roots. Container plants can be moved to a sheltered location (garage, cool greenhouse) over winter. Top growth may die back but roots can survive if protected.
3. Watering Issues
- Problem: Yellowing Leaves, Stunted Growth, Root Rot (Mushy Roots). - Cause: Overwatering or poor drainage, leading to waterlogged soil and oxygen deprivation for roots. - Solution: Ensure pots have drainage holes and garden beds drain well. Improve soil structure with organic matter and drainage materials (perlite). Water only when the top inch of soil feels dry. Allow soil to dry slightly between waterings, but not completely. If root rot is suspected, reduce watering immediately. Severe cases may require repotting into fresh, well-draining soil after trimming away any rotted roots.
- Problem: Wilting, Dry or Crispy Leaves, Slow Growth. - Cause: Underwatering; soil allowed to dry out too much. - Solution: Water more frequently, ensuring the soil remains consistently moist. Check soil moisture regularly, especially during hot or windy weather and for container plants. Apply mulch to help retain moisture.
4. Pest and Disease Management (Sustainable Focus)
- Pest: Aphids (Small, pear-shaped insects, often green or black, clustered on new growth). - Symptoms: Distorted new leaves, sticky honeydew residue, sometimes black sooty mold growing on honeydew. - Solution: Strong spray of water from a hose can dislodge them. Encourage beneficial insects like ladybugs, lacewings, and hoverflies (plant small-flowered plants like alyssum nearby). If necessary, spray with insecticidal soap or neem oil, following label directions carefully and applying in the evening to minimize harm to pollinators.
- Disease: Powdery Mildew (White, powdery patches on leaves and stems). - Symptoms: White fungal growth, typically on upper leaf surfaces first. - Solution: Improve air circulation by proper spacing and selective pruning. Avoid overhead watering. Remove affected leaves promptly. For persistent issues, sprays based on potassium bicarbonate, neem oil, or sulfur (use with caution) can be effective. Ensure good sanitation; clean up fallen debris.
- Pest: Snails and Slugs (Chewed holes in leaves, slime trails). - Symptoms: Irregular holes in leaves, often occurring overnight. Silvery slime trails may be visible. - Solution: Handpick pests in the early morning or late evening. Use barriers like copper tape around pots or raised beds. Set out beer traps (shallow containers filled with beer, sunk into the soil). Diatomaceous earth (food grade) can be sprinkled around plants (reapply after rain) as a desiccant barrier. Encourage natural predators like ground beetles and birds.
- Disease: Root Rot (See Watering Issues above). - Symptoms: Wilting despite moist soil, yellowing leaves, mushy brown roots, plant decline. - Solution: Prevention is key: use well-draining soil and avoid overwatering. Improve drainage if needed. If detected early, allow soil to dry more between waterings. Severely affected plants are difficult to save. Use sterile potting mix for containers.
5. Frequently Asked Questions (FAQ)
Why are my Ashitaba seeds taking so long to germinate?
Ashitaba germination can be naturally slow, often taking 3-5 weeks or more. Ensure seeds are viable (freshness matters!), maintain consistent moisture and warmth (60-70°F / 15-21°C), and provide high humidity. Patience is key!
How can I prevent my Ashitaba leaves from getting scorched or burnt?
Provide protection from intense afternoon sun, especially in hot climates (partial shade is ideal). Ensure the soil stays consistently moist. Gradually acclimate plants to sun exposure if moving them from a shadier spot.
What should I do if I suspect root rot in my Ashitaba plant?
Immediately reduce watering frequency and ensure the pot or garden bed has excellent drainage. Allow the top layer of soil to dry out more between waterings. If the problem persists or is severe, you may need to carefully remove the plant, trim away any soft, brown, mushy roots with sterile pruners, and repot into fresh, well-draining soil.
How do I control aphids organically on my Ashitaba plants?
Start with a strong jet of water to physically remove them. Encourage natural predators like ladybugs. If needed, apply insecticidal soap or neem oil sprays according to directions, targeting the aphids directly, preferably in the cool of the evening.
Can I grow Ashitaba indoors?
Yes, Ashitaba can be grown indoors in containers, provided you can offer bright light (such as a south-facing window or supplemental grow lights) and maintain consistent soil moisture. Ensure good air circulation and use a well-draining potting mix. Growth might be slower than outdoors.
What does Ashitaba taste like?
The flavour is often described as unique – somewhat like celery or parsley, with herbaceous notes and often a mild bitterness, especially in older leaves. Cooking tends to mellow the flavour. The yellow sap itself is quite bitter.
Comments (0)
No comments yet. Be the first to share your thoughts.